KServe 入門
開始之前
KServe 快速啟動環境僅供實驗使用。對於生產安裝,請參閱我們的管理員指南。
在開始使用 KServe Quickstart 部署之前,您必須安裝 kind 和 Kubernetes CLI。
安裝 Kind(Docker 中的 Kubernetes)
您可以使用 kind(Docker 中的 Kubernetes)來運行具有 Docker 容器節點的本地 Kubernetes 集群。
安裝 K3D(Docker 中的 Kubernetes)
創建本機 Docker Network
使用 docker 創建一個虛擬的網路來做為本次教程的網路架構。
| CIDR | 172.22.0.0/24 |
| CIDR IP Range | 172.20.0.0 - 172.20.0.255 |
| IPs | 256 |
| Subnet Mask | 255.255.255.0 |
| Gateay | 172.20.0.1 |
docker network create \
  --driver=bridge \
  --subnet=172.20.0.0/24 \
  --gateway=172.20.0.1 \
  lab-network
檢查 Docker 虛擬網絡 lab-network 的設定。
結果:
[
    {
        "Name": "lab-network",
        "Id": "2e2ca22fbb712cbc19d93acb16fc4e1715488c4c18b82d12dba4c1634ac5b1b6",
        "Created": "2023-02-09T23:07:33.186003336+08:00",
        "Scope": "local",
        "Driver": "bridge",
        "EnableIPv6": false,
        "IPAM": {
            "Driver": "default",
            "Options": {},
            "Config": [
                {
                    "Subnet": "172.20.0.0/24",
                    "Gateway": "172.20.0.1"
                }
            ]
        },
        "Internal": false,
        "Attachable": false,
        "Ingress": false,
        "ConfigFrom": {
            "Network": ""
        },
        "ConfigOnly": false,
        "Containers": {},
        "Options": {},
        "Labels": {}
    }
]
讓我們從這個虛擬網段裡的 CIDR IP Range 中保留 5 個 IP (172.20.0.10-172.20.0.15) 來做本次的練習。
創建 K8S 集群
執行下列命令來創建實驗 Kubernetes 集群:
k3d cluster create  --api-port 6443 \
  --port 8080:80@loadbalancer --port 8443:443@loadbalancer \
  --k3s-arg "--disable=traefik@server:0" \
  --k3s-arg "--disable=servicelb@server:0" \
  --network lab-network
參數說明:
--k3s-arg "--disable=servicelb@server:0"不安裝 K3D 預設的 traefik (IngressController), 我們將使用 nginx ingress controller--k3s-arg "--disable=traefik@server:0"不安裝 K3D 預設的 servicelb (klipper-lb), 我們將使用 metallb--network lab-network使用預先創建的 docker 虛擬網段
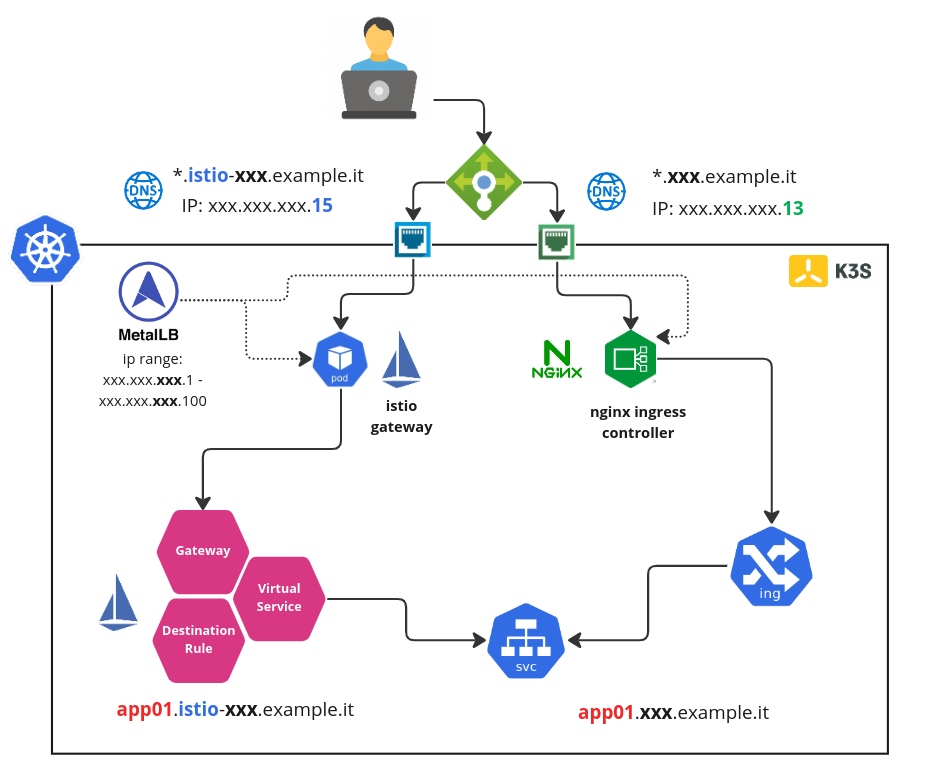
安裝/設定 MetalLB
在本次的結構裡, 有兩個負責南北向 traffic 的亓件, 主要原因是 Nginx Ingress Controller 是很多團隊己經使用的 ingress 的元件, 雖說 Istio Ingress Gateway 也可負責對外開放在 Kubernetes 裡頭的服務, 但是對大多數的團隊來說這樣的轉換需要熟悉與過渡。因此在本次的 lab 架構會同時並存這兩個元件並且使用 metallb 來配置固定的 IP。
Helm 安裝
使用 Helm 的手法來進行 Metallb 安裝:
# setup helm repo
helm repo add metallb https://metallb.github.io/metallb

helm repo update

# install metallb to specific namespace
helm upgrade --install --create-namespace --namespace metallb-system \
  metallb metallb/metallb
Tips
Metallb 在Version 0.13.2 版本有一個很重大的修改:
- 新功能: 支持CRD!期待已久的功能 MetalLB 現在可通過 CR 進行配置。
- 行為變化: 最大的變化是引入了 CRD 並刪除了對通過 ConfigMap 進行配置的支持。
設定 IP Adress Pool
我們將使用 MetalLB 的 Layer 2 模式是最簡單的配置:在大多數的情況下,你不需要任何特定於協議的配置,只需要 IP 地址範圍。
Layer 2 模式模式不需要將 IP 綁定到工作程序節點的網絡接口。它通過直接響應本地網絡上的 ARP 請求來工作,將機器的 MAC 地址提供給客戶端。
讓我們使用 CRD 來設定 Metallb:
cat <<EOF | kubectl apply -n metallb-system -f -
apiVersion: metallb.io/v1beta1
kind: IPAddressPool
metadata:
  name: ip-pool
  namespace: metallb-system
spec:
  addresses:
  - 172.20.0.10-172.20.0.15
---
apiVersion: metallb.io/v1beta1
kind: L2Advertisement
metadata:
  name: l2advertise
  namespace: metallb-system
spec:
  ipAddressPools:
  - ip-pool
EOF
結果:
Tip
如果只有一個 IP 要讓 Metallb 來給予,那麼 CIDR 的設定可設成 172.20.0.5/32 (也就是只有一個 IP: 172.20.0.5 可被指派使用)
安裝/設定 Nginx Ingress Controller
Helm 安裝
使用以下命令添加 Nginx Ingress Controller 的 chart 存儲庫:
設定 ingress-nginx 要從 metallb 取得特定的預設 IP (172.20.0.13):
controller:
  # add annotations to get ip from metallb
  service:
    annotations:
      metallb.universe.tf/address-pool: ip-pool
    loadBalancerIP: "172.20.0.13"
  # set ingressclass as default
  ingressClassResource:
    default: true
將 Nginx Ingress Controller 安裝到 kube-system 命名空間中:
helm upgrade --install \
     --create-namespace --namespace kube-system \
     ingress-nginx ingress-nginx/ingress-nginx \
     --values ingress-nginx-values.yaml
檢查:
結果:
NAME                                 TYPE           CLUSTER-IP      EXTERNAL-IP   PORT(S)                      AGE
ingress-nginx-controller             LoadBalancer   10.43.160.250   172.20.0.13    80:30672/TCP,443:30990/TCP   91s
Tip
特別注意 ingress-nginx-controller 的 EXTERNAL-IP 是否從 metallb 取得 172.20.0.13
驗證 Ingress 設定
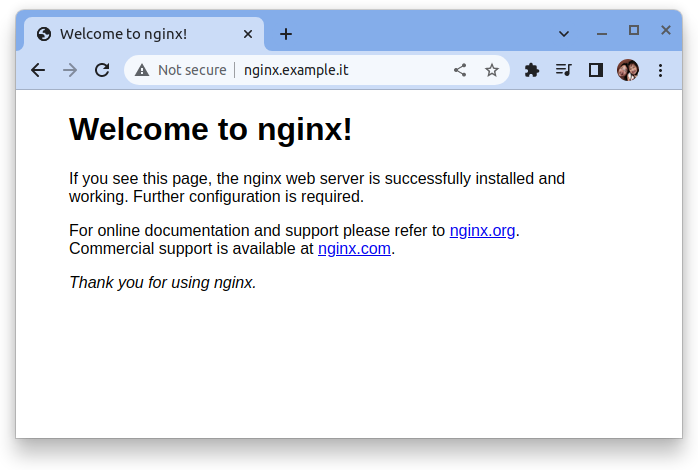
創建一個 Nginx 的 Deployment 與 Service:
創建 Ingress 來曝露這個測試的 Nginx 網站:
kubectl apply -f -<<EOF
apiVersion: networking.k8s.io/v1
kind: Ingress
metadata:
  name: ingress-nginx-svc
spec:
  rules:
  - host: "nginx.example.it"
    http:
      paths:
      - pathType: Prefix
        path: "/"
        backend:
          service:
            name: nginx
            port:
              number: 80
EOF
檢查看這個 ingress 是否有取得 IP ADDRESS:
結果:
修改 /etc/hosts 來增加一筆 entry 來模擬 DNS 解析:
使用瀏覽器瀏覽 http://nginx.example.it:
安裝 Kubernetes CLI
Kubernetes CLI (kubectl) 允許您針對 Kubernetes 集群運行命令。您可以使用 kubectl 部署應用程序、檢查和管理集群資源以及查看日誌。
安裝 KServe “Quickstart” 環境
您可以使用 Kind 上的 KServe 快速安裝腳本開始本地部署 KServe:
預設的佈署模式是 serverless, 而且這個安裝腳本會安裝下列關鍵組件:
- Istio (v1.19.4)
- Knative (v1.10.1)
- KServe (v0.12.1)
- CertManager (v1.3.0)
quick_install.sh
set -eo pipefail
############################################################
# Help                                                     #
############################################################
Help()
{
  # Display Help
  echo "KServe quick install script."
  echo
  echo "Syntax: [-s|-r]"
  echo "options:"
  echo "s Serverless Mode."
  echo "r RawDeployment Mode."
  echo
}

deploymentMode=serverless
while getopts ":hsr" option; do
  case $option in
      h) # display Help
        Help
        exit;;
      r) # skip knative install
        deploymentMode=kubernetes;;
      s) # install knative
        deploymentMode=serverless;;
    \?) # Invalid option
        echo "Error: Invalid option"
        exit;;
  esac
done

export ISTIO_VERSION=1.19.4
export ISTIO_DIR=istio-${ISTIO_VERSION}
export KNATIVE_SERVING_VERSION=knative-v1.10.1
export KNATIVE_ISTIO_VERSION=knative-v1.10.0
export KSERVE_VERSION=v0.12.1
export CERT_MANAGER_VERSION=v1.3.0
export SCRIPT_DIR="$( dirname -- "${BASH_SOURCE[0]}" )"

cleanup(){
  rm -rf deploy-config-patch.yaml
}
trap cleanup EXIT

get_kube_version(){
    kubectl version --short=true 2>/dev/null || kubectl version | awk -F '.' '/Server Version/ {print $2}'
}

if [ $(get_kube_version) -lt 24 ];
then
  echo "😱 install requires at least Kubernetes 1.24";
  exit 1;
fi

if [ -d ${ISTIO_DIR} ]; then
  echo "Already downloaded ${ISTIO_DIR}"
else
  curl -L https://istio.io/downloadIstio | sh -
fi
cd ${ISTIO_DIR}

# Create istio-system namespace
cat <<EOF | kubectl apply -f -
apiVersion: v1
kind: Namespace
metadata:
  name: istio-system
  labels:
    istio-injection: disabled
EOF

cat << EOF > ./istio-minimal-operator.yaml
apiVersion: install.istio.io/v1beta1
kind: IstioOperator
spec:
  values:
    global:
      proxy:
        autoInject: disabled
      useMCP: false

  meshConfig:
    accessLogFile: /dev/stdout

  components:
    ingressGateways:
      - name: istio-ingressgateway
        enabled: true
        k8s:
          podAnnotations:
            cluster-autoscaler.kubernetes.io/safe-to-evict: "true"
    pilot:
      enabled: true
      k8s:
        resources:
          requests:
            cpu: 200m
            memory: 200Mi
        podAnnotations:
          cluster-autoscaler.kubernetes.io/safe-to-evict: "true"
        env:
        - name: PILOT_ENABLE_CONFIG_DISTRIBUTION_TRACKING
          value: "false"
EOF

bin/istioctl manifest apply -f istio-minimal-operator.yaml -y;

echo "😀 Successfully installed Istio"
rm -rf ${ISTIO_DIR}

# Install Knative
if [ $deploymentMode = serverless ]; then
  kubectl apply --filename https://github.com/knative/serving/releases/download/${KNATIVE_SERVING_VERSION}/serving-crds.yaml
  kubectl apply --filename https://github.com/knative/serving/releases/download/${KNATIVE_SERVING_VERSION}/serving-core.yaml
  kubectl apply --filename https://github.com/knative/net-istio/releases/download/${KNATIVE_ISTIO_VERSION}/release.yaml
  # Patch the external domain as the default domain svc.cluster.local is not exposed on ingress
  kubectl patch cm config-domain --patch '{"data":{"example.com":""}}' -n knative-serving
  echo "😀 Successfully installed Knative"
fi

# Install Cert Manager
kubectl apply --validate=false -f https://github.com/jetstack/cert-manager/releases/download/${CERT_MANAGER_VERSION}/cert-manager.yaml
kubectl wait --for=condition=available --timeout=600s deployment/cert-manager-webhook -n cert-manager
cd ..
echo "😀 Successfully installed Cert Manager"

# Install KServe
KSERVE_CONFIG=kserve.yaml
MAJOR_VERSION=$(echo ${KSERVE_VERSION:1} | cut -d "." -f1)
MINOR_VERSION=$(echo ${KSERVE_VERSION} | cut -d "." -f2)
if [ ${MAJOR_VERSION} -eq 0 ] && [ ${MINOR_VERSION} -le 6 ]; then KSERVE_CONFIG=kfserving.yaml; fi

# Retry inorder to handle that it may take a minute or so for the TLS assets required for the webhook to function to be provisioned
kubectl apply -f https://github.com/kserve/kserve/releases/download/${KSERVE_VERSION}/${KSERVE_CONFIG}

# Install KServe built-in servingruntimes and storagecontainers
kubectl wait --for=condition=ready pod -l control-plane=kserve-controller-manager -n kserve --timeout=300s

if [ ${MAJOR_VERSION} -eq 0 ] && [ ${MINOR_VERSION} -le 11 ]; then
    kubectl apply -f https://github.com/kserve/kserve/releases/download/${KSERVE_VERSION}/kserve-runtimes.yaml
else
    kubectl apply -f https://github.com/kserve/kserve/releases/download/${KSERVE_VERSION}/kserve-cluster-resources.yaml
fi

# Patch default deployment mode for raw deployment
if [ $deploymentMode = kubernetes ]; then
cat <<EOF > deploy-config-patch.yaml
data:
  deploy: |
    {
      "defaultDeploymentMode": "RawDeployment"
    }
EOF
kubectl patch cm inferenceservice-config -n kserve --type=merge --patch-file=deploy-config-patch.yaml
fi
echo "😀 Successfully installed KServe"